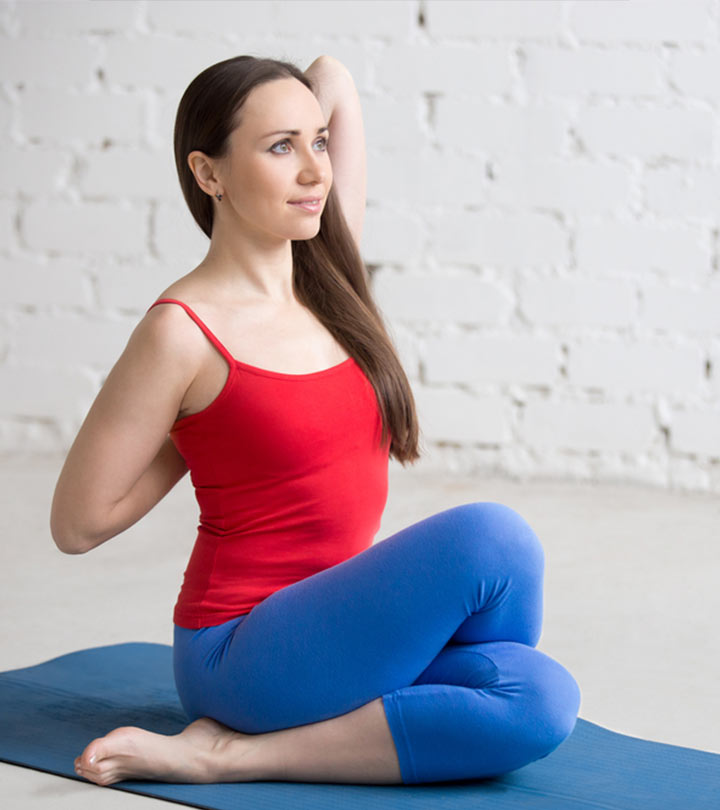
Gomukhasana or Cow Face Pose is an asana. Sanskrit: गोमुखासन; Go – Cow, Mukha – Face, Asana – Pose; Pronounced As: go-moo-KAHS-anna
Here, we will be discussing the benefits of gomukhasana. This asana is named after the Sanskrit terms ‘Go,’ which means cow, ‘Mukha,’ which means face, and ‘Asana,’ which means position.
If you didn’t know, the word ‘Go’ also implies light. As a result, ‘Gomukh’ can also mean ‘head lightness’ or ‘headlight.’ However, this asana gets its name because the body resembles a cow’s face when performed. The calves and thighs are positioned to be wide on one end and taper on the other. Scroll down to read more.
Everything You Need To Know About The Gomukhasana
- What You Should Know Before You Do The Asana
- How To Do The Gomukhasana
- Precautions And Contraindications
- Beginner’s Tips
- Advanced Pose Variations
- Benefits Of The Cow Face Pose
- The Science Behind The Gomukhasana
- Preparatory Poses
- Follow-Up Poses
What You Should Know Before You Do The Asana
It is best if the Gomukhasana is performed first thing in the morning. Its benefits are numerous. Your stomach and bowels must be empty when you practice this asana. Make sure you have your meals at least 10 to 12 hours before your practice.
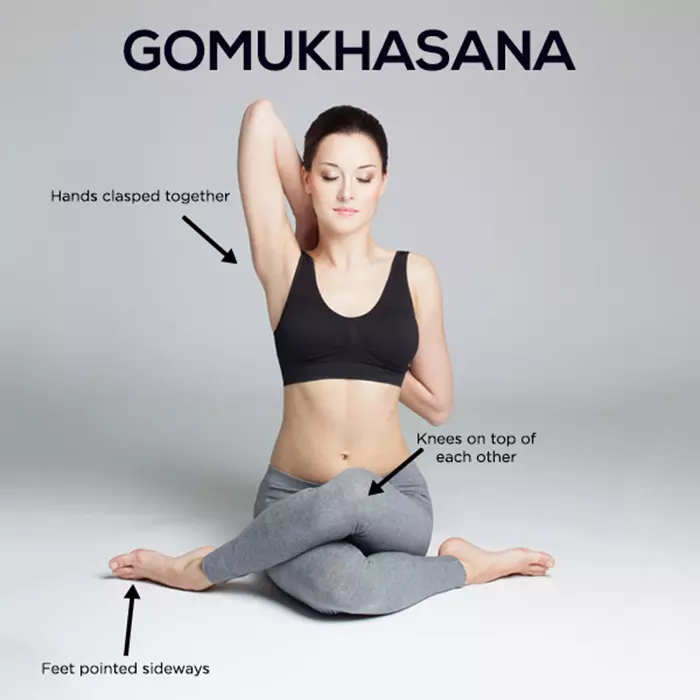
Image: Shutterstock
- Level: Basic
- Style: Hatha
- Duration: 30 to 60 Seconds
- Repetition: Once with your right leg over the left and then vice versa
- Stretches: Shoulders, Hip, Thighs, Thorax, Ankles, Triceps brachii muscle, Axilla
- Strengthens: Back, Chest
How To Do Gomukhasana
Image: Shutterstock
- Sit erect on the ground with your legs stretched out in front of you, preferably in Dandasana.
- Now gently bend your left leg, and place it under your right buttock.
- Fold your right leg and place it over your left thigh.
- Place both your knees close together as they are stacked one on top of the other.
- Gently fold your left arm and place it behind your back.
- Take your right arm over your right shoulder, and stretch it as much as you can until it reaches your left hand. With practice, you will be able to not just reach, but also catch your left hand.
- Keep the trunk erect, expand your chest, and lean slightly back.
- Hold this pose for as long as you are comfortable, as you breathe slowly and deeply. Concentrate on your breathing.
Related: 12 Basic Yoga Asanas For Beginners To Ease Into The Routine
Precautions And Contraindications
Image: Shutterstock
There are some points of caution that you must keep in mind before you practice this asana.
- People with rotator cuff injuries, and knee pains must refrain from practicing this asana or look for suitable modifications. If you have backache, it is best to consult a doctor before you do this asana, and practice only under the supervision of a certified yoga instructor.
- If you have tight shoulders and fail to clasp your fingers behind your back, use a strap between your hands. Start the pose with a strap draped over the shoulder of the lower arm. Slide the lower arm to the back (you must ensure that you slide your arm as much to the top of the back as possible), then catch the free end of the strap with the upper arm.
- In case of other restrictions, performing this exercise might be difficult. But don’t fret. Instead, start small. You can begin by trying to take your hands backward, holding elbow to elbow (you don’t have to clasp the fingers), and simply stretching your legs and crossing one over the other. With time and patience, you will be able to perform the pose perfectly as it makes your body flexible and easy to stretch.
Related: 7 Yoga Exercises For Concentration That Work Wonders StyleCraze Says You can also try the revolved cow face pose. Sit in the same shoelace pose and twist the upper body to stretch the spine and allow inner rotation of the hip.
Beginner’s Tips
Beginners usually find it difficult to get their sitting bones to rest evenly on the floor. This makes stacking the knees evenly over each other quite difficult. The spine cannot extend itself properly when the pelvis is tilted. So use a blanket or bolster to support and lift the sitting bones.
Advanced Pose Variations
Image: Shutterstock
To increase the stretch in this pose, you must have flexible shoulders. Just move your hands a little away from the back of the torso. From the full pose by leaning forward and laying your torso on the inner part of the thigh on top. Hold the pose for at least 20 seconds, and inhale as you come up.
Related: 9 Yoga Asanas For Beginners, Intermediate, & Advanced Stages
Benefits Of The Cow Face Pose
Image: Shutterstock
These are some amazing benefits of Gomukhasana.
- This asana helps to flex the back, making it more elastic.
- It helps to cure stiff shoulders and also helps in releasing the cervical spine.
- Practicing the Gomukhasana also aids in the treatment of sciaticai XPain that radiates from the lower back to the back of both legs due to pressure or injury to the sciatic nerve. .
- It enhances the working of the kidneys, thereby helping those suffering from diabetes.
- Works on making the pericardiumi XA fluid-filled sac that surrounds the heart and its blood vessels and lubricates and protects it from the surrounding structures. area more accessible.
- Practicing this asana regularly can reduce stress and anxiety.
StyleCraze Says The Gomukhasana engages muscle groups in your limbs, hips, back, shoulders, and chest, strengthening them.
The Science Behind The Gomukhasana
This asana involves your shoulders and hips, both of which are common sites that house tension and chronic pain. This asana, quite prominently, enhances the range of motion in the shoulder joints. Even if you have tight shoulders, and you continue practicing this asana, in a span of a few months, your shoulders will loosen out. This asana is therapeutic and helps in pressure release.
Gomukhasana, or the Cow Face Pose, relaxes the muscles and imparts a sense of calm. When you attempt to pull your hands in this pose, the tension in the muscle-tendon joints of your body gets escalated. In response to this tension, the spinal cord signals the muscles to relax. The ‘stretch’ this pose creates (like most other yoga poses) results in the release of endorphins that induce a feeling of relaxation within your body and mind (1).
In a study conducted at The Chinese University of Hong Kong, it was found that Hatha yoga (of which Gomukhasana is a part) can enhance cardiovascular endurance, flexibility, and muscular strength (2).
Preparatory Poses
Baddha Konasana
Supta Virasana
Supta Baddha Konasana
Supta Padangusthasana
Upavistha Konasana
Virasana
Follow-Up Poses
Ardha Matsyendrasana
Bharadvajasana
Garudasana
Marichyasana III
Padmasana
Paschimottanasana
Upavistha Konasana
This asana is extremely simple, yet extremely beneficial. Who could have imagined that a little stretching could go a long way in healing your body, mind, and soul?
Gomukhasana is a very easy but helpful form of exercise. It involves your shoulders and hips, which are major sites for persistent pain and tension. This asana improves the range of motion in the shoulder joints significantly and aids in releasing pressure. Also, gomukhasana is a calming pose that soothes the muscles. The ‘stretch’ of this asana causes the release of endorphins, which helps relax your body and mind. So, follow the steps mentioned in the article and enjoy the wonderful benefits of Gomukhasana.
Frequently Asked Questions
Who should not do gomukhasana?
People with spondylitisi XAn inflammatory condition that causes bones in the spine to fuse and reduces the spine’s flexibility, leading to a hunched posture. , piles, and knee, muscle, and shoulder injuries should not do gomukhasana.
Is gomukhasana a hip opener?
Yes, gomukhasana is a hip opener. It stretches the piriformis, gluteal muscles, and the outer legs and opens the hips.
Is gomukhasana a meditative asana?
Gomukhasana is a seated asana in yoga and is also used for meditation.
Was this article helpful?
“>
Related
The following two tabs change content below.
- Reviewer
- Author
Anirudh Gupta, Certified Yoga Instructor

Anirudh has 9 years of experience as a Certified Yoga Instructor – RYT 200 – Yoga Alliance from Yoga Vedanta Centre. His teaching style incorporates the therapeutic principles of healing into the asanas and leaves one refreshed and energized. He teaches in and around South Mumbai, travels for workshops in India and overseas, and is called upon by the corporate…View Profile ›

Shirin Mehdi, Health & Wellness Writer
Shirin is a health and wellness writer with three years of experience and specializes in writing articles on yoga and has extensive knowledge about the postures of the asanas. Prior to joining Stylecraze, she interned with an advertising firm as a copywriter and as an editorial intern for a luxury fashion magazine. Always muddled up between traditions and modernism, she…View Profile ›